How to deploy?
Introduction
This guide provides a step-by-step process to install the Sciamus Catalogue Driven Order Management system (SCDOM).
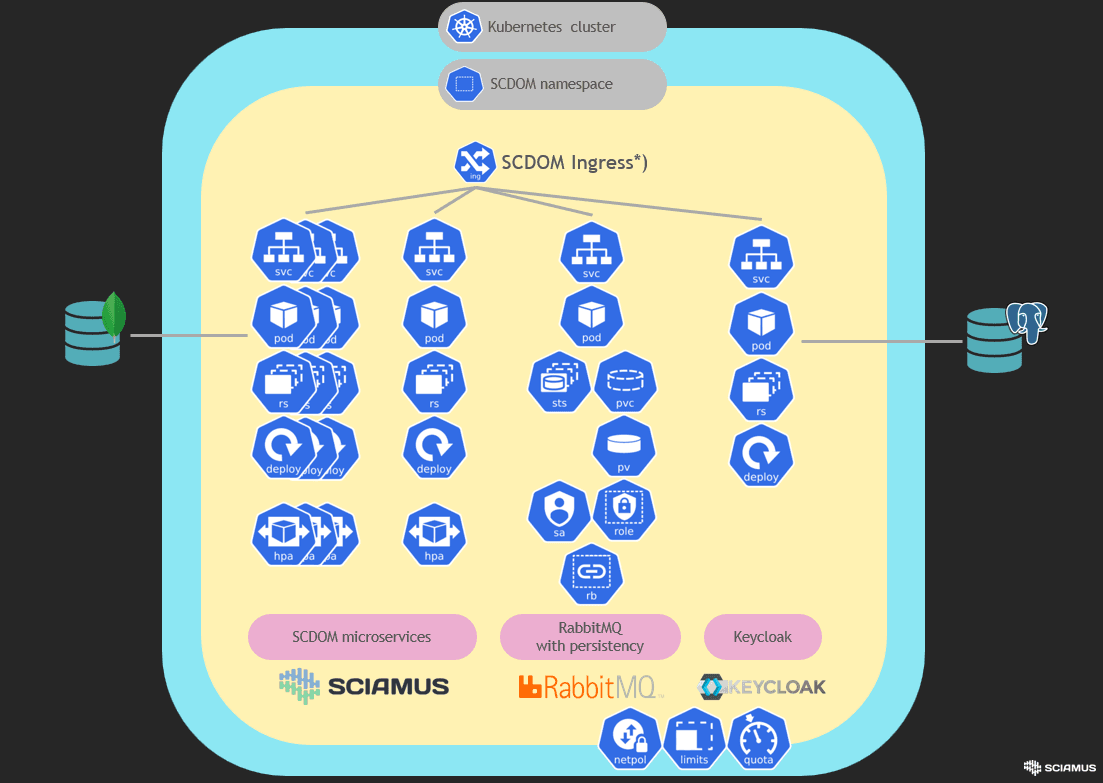
*) Ingress is optional, SCDOM API may be exposed according to organisation guidelines and practisws for K8s cluster.
Prerequisites
Before starting the installation process, ensure the following prerequisites are met:
- Kubernetes Cluster - running K8s cluster is required. You can use cloud providers like GKE (opens in a new tab), EKS (opens in a new tab), AKS (opens in a new tab), or an on-premise setup.
- MongoDB - MongoDB database (version as described here) is required. You can use cloud offering such as MongoDB Atlas (opens in a new tab), AWS DocumentDB (opens in a new tab) or an on-premise self-managed MongoDB instance.
- PostgreSQL - PostgreSQL database (version as described here) is required. You can use cloud offering such as AWS RDS (opens in a new tab), GCP (opens in a new tab), Azure (opens in a new tab) or an on-premise self managed PostgreSQL instance.
- Helm - ensure Helm (opens in a new tab) is installed and configured to interact with your K8s cluster.
helm version- kubectl - ensure that kubectl (opens in a new tab) is installed (opens in a new tab) and configured to interact with your Kubernetes cluster.
kubectl version --client- Image registry - as SCDOM system is provided in the form of source code, you must build binaries for all SCDOM microservices, deploy them in the form of images in image registry - preferably one used by your CI/CD platform - that your K8s cluster can access (e.g., Docker Hub, private registry).
MongoDB
Make sure that database user for particular microservice is entitled to create databases. This is the easiest way to allow SCDOM system to manage its own database.
If you want to limit privileges, please make sure that application user is granted readWrite role for database used by the microservice.
This should be performed for all microservice databases.
- core
- som-auditlog
- som-fulfillment
- som-orders
- som-product-catalogue
- som-service-dead-letter
- som-service-error
- custom microservices
- (...)
- custom, deployment specific databases for step executors
- (...)
Below you can find example for audit-logs.
use admin

db.createUser(
  {
    user: "som",
    pwd: "top-secret-password",
    roles: [
      { role: "readWrite", db: "som-auditlog" }
    ]
  }
)
Build & deploy overview
SCDOM is provided in form of source code. Note that SCDOM repository consists of several domains, in which you can find source code for specific libraries and microservices.
SOM
 |
 +--core
     |
     | (...)
     +--fulfillments                                // domain
     |   |
     |   +--som-contract-fulfillment-commands       // library
     |   +--som-contract-fulfillment-events         // library
     |   +--som-contract-fulfillment-query          // library
     |   +--som-service-fulfillment                 // microservice
     | (...)
     (...)
To build and deploy the system, the following steps must be performed:
Build
- Build the libraries
- Build the microservices, build and store microservice container image
- Optionally, set up Keycloak if your organization does not already have an identity and access management (IAM) solution, or if you prefer not to use an existing one
Deploy
- Deploy Keycloak on your K8s cluster
- Deploy RabbitMQ on your K8s cluster
- Deploy the system on your K8s cluster
Build
Libraries
For each library - compile, build and deploy in package registry.
mvn --batch-mode deploy \
  --update-snapshots \
  -DskipTests \
  -Dmaven.install.skip=true \
  -Dmaven.repo.local=~/.m2/repository \
  --settings your_maven_settings.xml
This should be performed for all libraries provided in SCDOM repository.
SCDOM Microservices
Compile source code, build and deploy jar in package registry.
mvn --batch-mode deploy \
  --update-snapshots \
  -DskipTests \
  -Dmaven.install.skip=true \
  -Dmaven.repo.local=~/.m2/repository \
  --settings your_maven_settings.xml
Then build image and deploy it to image registry.
docker login "$REGISTRY"
docker build -t "$IMAGE_NAME":"$IMAGE_TAG" .
docker push  "$IMAGE_NAME":"$IMAGE_TAG"
Adjust REGISTRY, IMAGE_NAME and IMAGE_TAG according to your needs (e.g. CI/CD standards).
This should be performed for all microservices provided in SCDOM repository.
Keycloak
SCDOM requires Keycloak for essential operations therefore, our company provides Keycloak configuration with a product code. You can use an existing instance of the tool if you already have one, alternatively follow this build instruction to prepare Keycloak docker image.
Important note! Keycloak requires database to run. Provided configuration sets PostgreSQL database as a default. To change the database type, navigate to the Dockerfile inside Keycloak repository and modify the configuration according to following documentation (opens in a new tab).
Build Keycloak container image by running following commands inside Keycloak repository provided with SCDOM code:
docker build -t "$IMAGE_NAME":"$IMAGE_TAG" .Deploy built image to image registry.
docker login "$REGISTRY"
docker push  "$IMAGE_NAME":"$IMAGE_TAG"
Deploy
Keycloak
Skip this part of deployment if your company is already using Keycloak. Remember to configure SCDOM microservices with an existing Keycloak instance.
Inside keycloak-basic-deployment (opens in a new tab) repository navigate to the chart/values.yml file and complete configuration with the appropriate values.
Install Keycloak on K8S cluster using Helm:
helm upgrade -n $namespace --install Keycloak .RabbitMQ
Important note! RabbitMQ in SCDOM acts is a comunication backbone. The dedicated RabbitMQ cluster has to be deployed as described below. You should not use your existing RabbitMQ instance dedicated other purposes.
Use Bitnami Helm chart for RabbitMQ: https://github.com/bitnami/charts/tree/main/bitnami/rabbitmq (opens in a new tab)
Note, that SCDOM utilizes quorum queues (opens in a new tab) to ensure persistency and high availability - thus persistence (PersistentVolume) should be enabled in your K8s cluster.
- Create
PersistentVolumeandPersistentVolumeClaim. This should be adjusted according to your K8s cluster configuration. E.g. you can useStorageClassto createPersistentVolumeor evenPersistentVolumeClaim- consult with your K8s cluster administrator.
# pv-and-pvc.yaml
---
apiVersion: v1
kind: PersistentVolume
metadata:
  name: sciamus-rabbitmq-pv
spec:
  accessModes:
    - ReadWriteMany
  persistentVolumeReclaimPolicy: Delete
  capacity:
    storage: 8Gi
  storageClassName: standard
  hostPath:
    path: /tmp/sciamus-rabbitmq-pv
---
apiVersion: v1
kind: PersistentVolumeClaim
metadata:
  name: sciamus-rabbitmq-pvc
spec:
  accessModes:
    - ReadWriteMany
  resources:
    requests:
      storage: 8Gi
  storageClassName: standard
  volumeName: sciamus-rabbitmq-pv
kubectl -n som apply -f ./pv-and-pvc.yaml- Prepare RabbitMQ user definitions and store it in
Secret. You can use preffered approach to storage sensitive data (such as passwords) using solution utilized in your environment (e.g. AWS Secret Manger or Vault or any other solution that suits your needs).
# load_definition.json
# This is an example of users that could be configured in RabbitMQ cluster.
#   som-app             - Application user, used by SCDOM microservices, without GUI access
#   rabbitmq-admin      - RabbitMQ admin, full priviliges
#   rabbitmq-monitoring - User with GUI access, without restrictions, with monitoring priviliges
#   rabbitmq-management - User with GUI access, without restrictions, with management priviliges
#   rabbitmq-user-rw    - User with GUI access, withouth configuration priviliges, with management priviliges
#   rabbitmq-user-ro    - User with GUI access, read only, with management priviliges
# For details see https://www.rabbitmq.com/docs/management#permissions.
{
  "users": [
    {
      "name": "som-app",
      "password": "top-secret-password",
      "tags": ""
    },
    {
      "name": "rabbitmq-admin",
      "password": "top-secret-password",
      "tags": "administrator"
    },
    {
      "name": "rabbitmq-monitoring",
      "password": "top-secret-password",
      "tags": "monitoring"
    },
    {
      "name": "rabbitmq-management",
      "password": "top-secret-password",
      "tags": "management"
    },
    {
      "name": "rabbitmq-user-rw",
      "password": "top-secret-password",
      "tags": "monitoring"
    },
    {
      "name": "rabbitmq-user-ro",
      "password": "top-secret-password",
      "tags": "monitoring"
    }
  ],
  "permissions": [
    {
      "user": "som-app",
      "vhost": "/",
      "configure": ".",
      "read": ".",
      "write": "."
    },
    {
      "user": "rabbitmq-admin",
      "vhost": "/",
      "configure": ".",
      "read": ".",
      "write": "."
    },
    {
      "user": "rabbitmq-monitoring",
      "vhost": "/",
      "configure": ".",
      "read": ".",
      "write": "."
    },
    {
      "user": "rabbitmq-management",
      "vhost": "/",
      "configure": ".",
      "read": ".",
      "write": "."
    },
    {
      "user": "rabbitmq-user-rw",
      "vhost": "/",
      "configure": "^$",
      "read": ".",
      "write": "."
    },
    {
      "user": "rabbitmq-user-ro",
      "vhost": "/",
      "configure": "^$",
      "read": ".",
      "write": "^$"
    }
  ],
  "vhosts": [
    {
      "name": "/"
    }
  ]
}
kubectl -n som \
create secret generic som-rabitmq-load-definition \
--from-file ./load_definition.json- Create erlang cookie as
Secret
kubectl -n som \
  create secret generic som-rabitmq-erlang-cookie \
--from-literal=rabbitmq-erlang-cookie=$(openssl rand -hex 64 | base64 -w 0 | base64 -d)- Configure values
# values.yaml
image:
  registry: docker.io
  repository: bitnami/rabbitmq
  tag: 3.12.13-debian-12-r2
  debug: true

auth:
  existingErlangSecret: "som-rabitmq-erlang-cookie"

clustering:
  rebalance: all
  forceBoot: true

loadDefinition:
  enabled: true
  existingSecret: "som-rabitmq-load-definition"

extraConfiguration: |-
  management.path_prefix = /rabbitmq
  load_definitions = /app/load_definition.json
  raft.wal_max_size_bytes = 128000000
  cluster_formation.target_cluster_size_hint = {{ .Values.replicaCount }}
  log.default.level = debug
  log.file = false
  log.console = true
  log.console.level = debug
  log.console.formatter = json

replicaCount: 3

resources:
  requests:
    cpu: 750m
    memory: 1024Mi
  limits:
    cpu: 1500m
    memory: 1024Mi

persistence:
  storageClass: "-" # Forces static provision
  accessModes:
    - ReadWriteMany
  existingClaim: "sciamus-rabbitmq-pvc"

metrics:
  enabled: true

volumePermissions:
  enabled: true
  resources:
    requests:
      cpu: 50m
      memory: 12Mi
    limits:
      cpu: 100m
memory: 24Mi- Install RabbitMQ using Helm
# add bitnami repo
helm repo add bitnami https://charts.bitnami.com/bitnami

# install RabbitMQ (with preconfigured PV & PVC)
helm upgrade \
  --namespace som \
  -f values.yaml \
  --install som-rabbitmq \
  bitnami/rabbitmq --version 13.0.0
Note, that commands and configuration presented above are based on Helm chart version 13.0.0 and RabbitMQ version 3.12.13. You can adjust versions according to your needs and newer versions availability.
SCDOM Microservices
Use Helm chart provided along with particular SCDOM microservice.
Pre-deployment advice
Ensure you have:
- rabbitmq
- keycloak
- mongodb
- Ingress for outside cluster communication
Check your general configuration and enviorment variables for gui Please note that som-service-gui does not use a generic template helm. Gui has a full chart in its repository. In the examples section you will find an example configuration
    somTemplates:
      general:
        ....
        externalConfiguration:
          ingressHost: "https://external-address.local/" <- your ingress host
          keycloakAuthUrl: "http://keycloak-service.dev.svc.cluster.local:8080/keycloak/auth" <- your keycloak keycloak url
GUI:
    env:
    - name: REST_API_URL
      value: "https://external-address.local/som-service-bff" <- external bbf address
    - name: KEYCLOAK_URL
      value: "https://external-address.local/keycloak/auth"
    - name: REALM
      value: som
Also check your rabbitmq and mongo settings
Microservices configuration
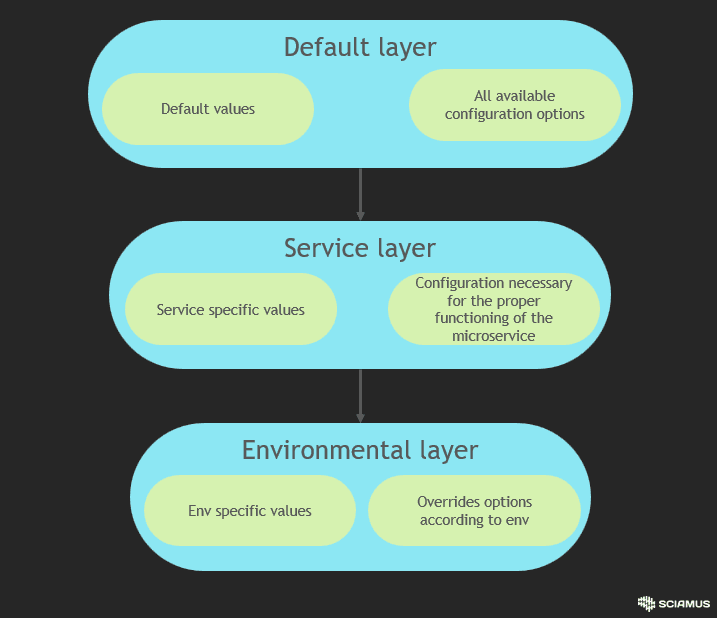
In order to provide the most flexible configuration for our microservices we created 3 layered approach:
- som-chart-template repository - default layer - contains all available configuration option with default values. All options can be specified also on higher configuration layers. Default layer is built as sperate code repository that provides helm sub-chart, which is intersection for all microservices.
- .som-chart directory - service layer - located inside the microservice repository, it contains configurable options specific to the respective microservice. If a service uses a connection to Keycloak or a database, the details will be defined within this layer. Every configured option within this layer is compatible with the default layer template but should contains non-default values. Configuration within this layer is necessary for the correct startup of the service.
- Environmental layer - the topmost layer that provides environmental configuration, such as image tag information, repository address, or any configurations that override previous layers for a specific environment. This layer is optional and highly depends on the CI/CD approach and it is not provided with SCDOM.
Basic deploy
Below you can find example for SOM/core/incoming-orders/som-service-incoming-orders microservice.
-
Configure default layer sub-chart Inside som-chart-template repository provided along SCDOM microservices search for values.yaml file. We highly recommend to change values inside this repository only when you are sure that configuration provided refers to all microservices on all of your environments.
-
Build default sub-chart Inside som-chart-template run following command:
helm package chart/-
Push som-chart-template helm package to helm repository. This step is specific for helm registry that is used in company.
-
Review service layer configuration. Inside the som-service-incoming-orders repository, locate the .som-chart/values.yml file, which contains service-specific configurations. Review the following settings to ensure they align with your company's policy and do not require adjustments.
-
Build environment layer - optional. To modify specific configuration options for each environment, it is recommended to build an environment layer. An additional values.yml file for each service should be created and stored as follows.
# Enviormental laver configuration example
somTemplates:
  general:
    namespace: "prod"
    imageRegistry:
      basePath: "myProdRegistry.docker.com"
    internalConfiguration:
      mongodb:
        protocol: "mongodb+srv"
        parameters:
          base: "/?retryWrites=true&w=majority"
          query: "/?retryWrites=false&w=majority&readPreference=secondaryPreferred"
        defaultSecret:
          mongodbHost: "mongoHostProd"
          mongodbPort: 27017
          mongoUser: "mongoUser"
          mongoPassword: "mySecretMongoPassword"
      rabbitmq:
        rabbitmqHost: "rabbitHostProd"
        rabbitmqPort: 5672
        defaultSecret:
          rabbitmqUser: "rabbitUser"
          rabbitmqPassword: "mySecretRabbitPassword"
    externalConfiguration:
      keycloakAuthUrl: "https://prod-keycloak-url/keycloak/auth"
      keycloakRealm: "prod"

somTemplates:
  somService:
    global:
      image:
        repository:
          imagePath: "path/to/som-service-incoming-order/image/in/registry"
        pullPolicy: Always
        tag: "latest"
      imagePullSecrets: "prod-image-pull-secret"

    env:
    - name: _JAVA_OPTIONS
      value: "-XX:MaxRAMPercentage=75 -XX:+ExitOnOutOfMemoryError"
    resources:
      limits:
        cpu: 1000m
        memory: 512Mi
      requests:
        cpu: 500m
memory: 512Mi- Install microservice using Helm Inside the som-service-incoming-orders repository run:
#Add default layer sub-chart repository to helm configuration with credentials
helm repo add somTemplates $HELM_REGISTRY_ADDR \
  --username $HELM_REGISTRY_USER \
  --password $HELM_REGISTRY_PASSWORD

#Build helm dependency - download default layer sub-chart
helm dependency build

#Deploy service on namespace som
helm upgrade \
  -f env_layer_values.yml \
  --install som-service-incoming-orders \
  --namespace som . \
  --wait --timeout 600s
This should be performed for all SCDOM microservices.
Recomended deployment in real life enviorment
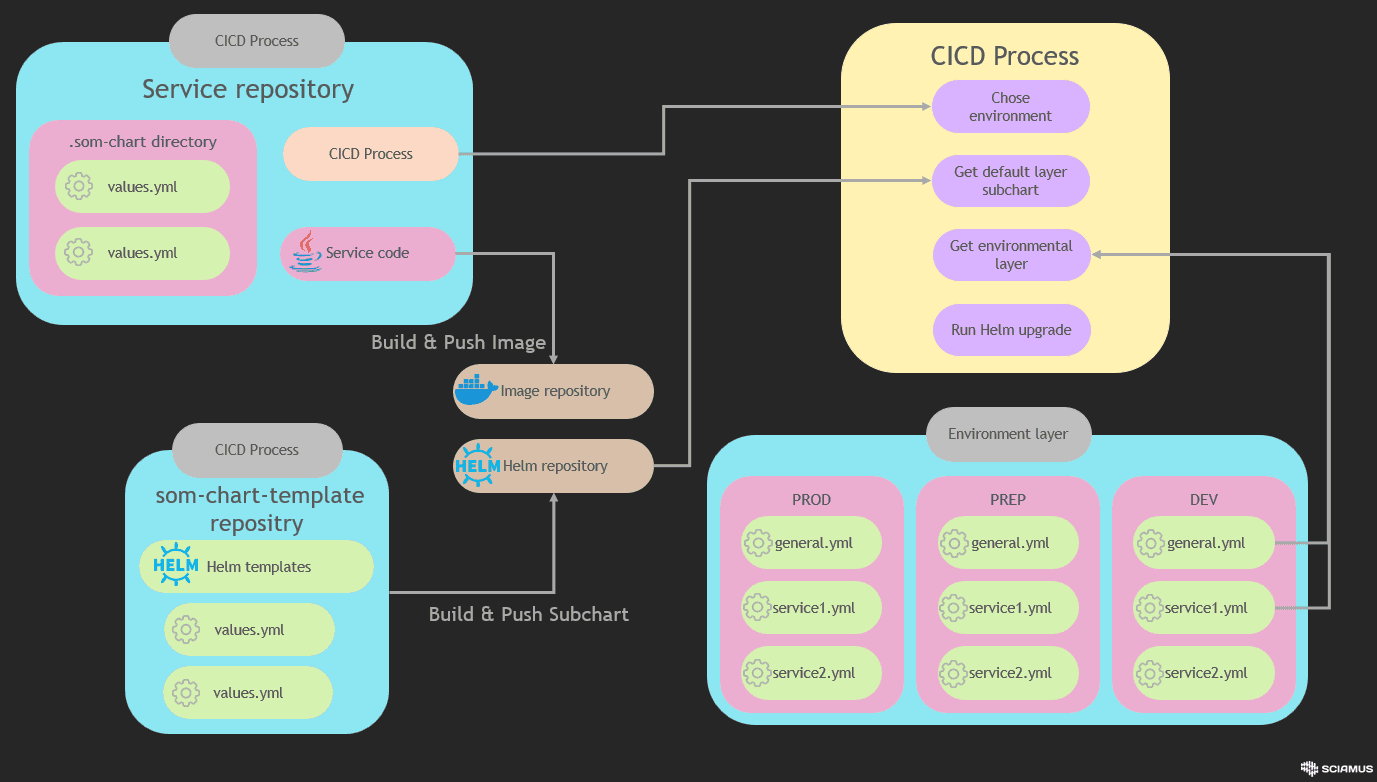
Exmplary repository file structure for CICD process can be found under following link: https://gitlab.aws.sciamus.com/sciamus-showcase/som-cicd-showcase (opens in a new tab)
How it works
The recommended CICD is built on two processes:
- Preparing default layer subchart
- Service deployment
Those two processes are implemented as separate pipelines.
Default layer subchart process
The pipeline builds the default configuration subchart and pushes the built package to the Helm registry. It should be executed every time the default layer configuration is modified.
helm package chart/
helm push
Push command depends on helm registry type.
Service deployment process
This process is implemented inside service repository. There are no contraindications to implement build job alongside. Deployment process has access to service layer configuration by default.
- Default layer integration Service configuration layer is set as a parent Helm chart for default configuration. Every service layer parameter will override default values. During the building process default layer package is pulled from Helm registry.
helm dependency build- Environment layer integration
Environment layer configuration is stored as a independent repository divided info subdirectories for each environment. Based on the microservice name and information about the target environment for deployment, the deployment process downloads the environmental layer configuration as flat configuration files from the appropriate environment subdirectory.
Every directory contains:
- general.yml - file contains general entity override - configuration is the same for each service inside the same environment.
- many $SERVICE_NAME.yml files - configuration that overrides default and service layers configuration for specific service.
The pipeline retrieves information about the default and environmental layers as described above and executes the helm upgrade command:
helm upgrade \
  -f general.yml \
  -f service1.yml
  --install service1 \
  --namespace som . \
  --wait --timeout 600s